









Overview
DLNA lets devices on your home network share media. Windows includes a built-in DLNA media server, so your smart TV, console, or media player can stream content straight from your PC. This guide shows how to enable and manage it.
Turn your PC into a DLNA media server for your network.
Key Takeaways
- DLNA streams media from your PC to TVs, consoles, and players on the same network.
- Enable it via Media streaming options in the Control Panel.
- You can allow or block specific devices.
- Both the PC and device must be on the same (Private) network.
What Is DLNA?
DLNA (Digital Living Network Alliance) is a standard that lets compatible devices discover and play media from each other over a local network — no cables or cloud needed.
Step 1 — Turn On Media Streaming
1. Press Windows key + R, type control, and open Control Panel.
2. Go to Network and Sharing Center > Media streaming options (or search "media streaming").
3. Click "Turn on media streaming".
4. Name your media library — it now appears as a DLNA server on the network.
Step 2 — Manage Device Permissions
1. In Media streaming options, see the list of detected devices.
2. Set each to Allowed or Blocked.
3. Use "Allow All" or "Block All" for quick control, then customise.
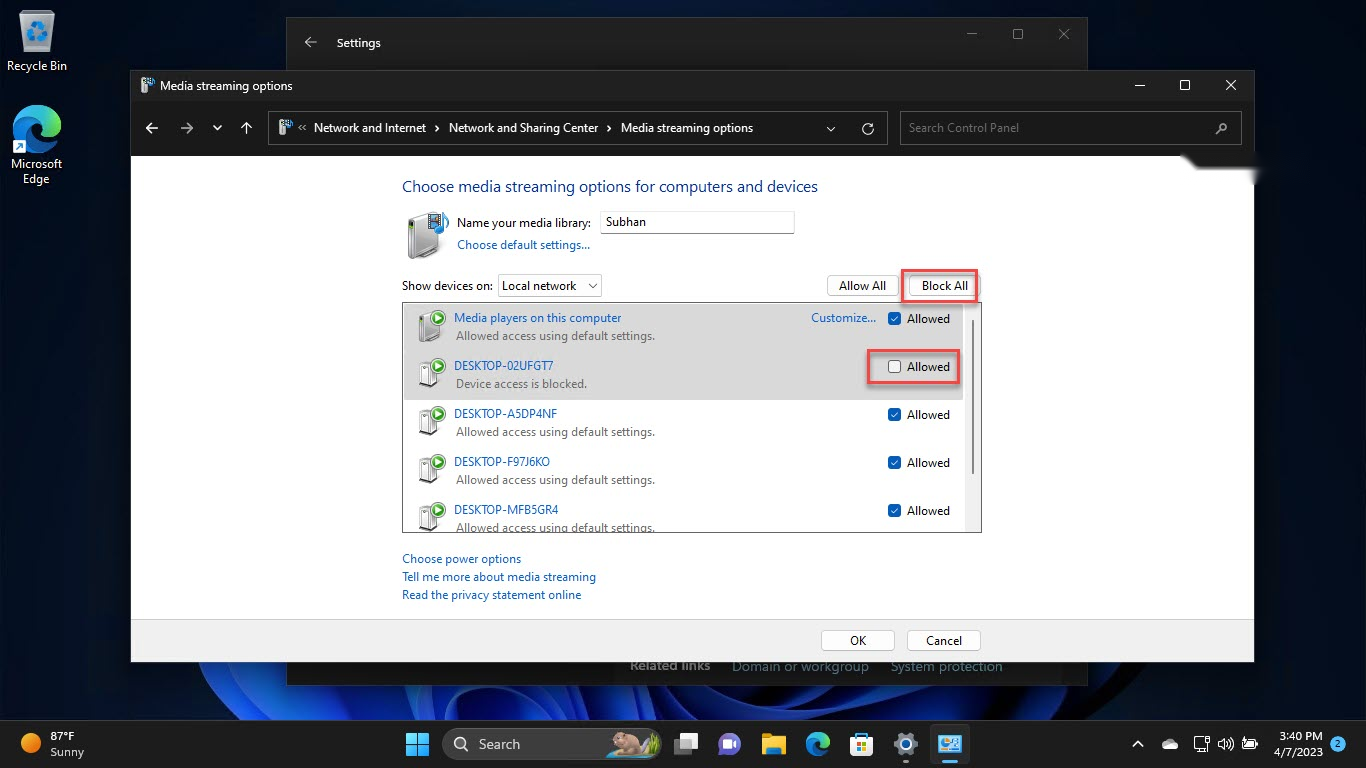
Allow or block specific devices from the DLNA server.
Step 3 — Play From a Device
1. On your TV/console/player, open its media/DLNA source.
2. Select your PC’s media library from the list.
3. Browse and play your music, photos, and videos.
How to Disable the DLNA Server
1. Return to Media streaming options.
2. Block all devices, or stop the Windows Media Player Network Sharing Service in services.msc.
3. This disables streaming until you turn it back on.
Troubleshooting
Problem: The PC is not visible to my TV.
Solution: Ensure both are on the same network set to Private, Network discovery is on, and the firewall allows media streaming.
Problem: Some files will not play.
Solution: The device may not support the format/codec; convert the file or add the folder to your media libraries.
Problem: Media library is empty.
Solution: Add your media folders to the Windows libraries (Music, Pictures, Videos), which the DLNA server shares.
Problem: Streaming stutters.
Solution: Use a wired connection or stronger Wi-Fi, and avoid very high-bitrate files over weak links.
Conclusion
Windows’ built-in DLNA server makes home streaming easy: turn on media streaming, allow your devices, and play your library on any DLNA-compatible TV or player on the same network.
</w:pBdr><w:spacing w:before="220" w:after="40"/></w:pPr><w:r><w:rPr><w:b/><w:bCs/><w:color w:val="0B5394"/><w:sz w:val="21"/><w:szCs w:val="21"/><w:rFonts w:ascii="Calibri" w:cs="Calibri" w:eastAsia="Calibri" w:hAnsi="Calibri"/></w:rPr><w:t xml:space="preserve">About SoftwareKey.lk
This guide is part of the SoftwareKey.lk Knowledge Base. For more step-by-step IT guides and support, visit softwarekey.lk.